

[su_button url=”http://www.sigaostudios.com/2016/08/an-angularjs-in-net-core-journey-step-1/” style=”flat” icon=”icon: chevron-left”]Go back to Part 1 (Setup .NET Core)[/su_button]
In our last post, we walked through setting up Visual Studio 2015 to work with .NET Core and created an Empty ASP.NET Core solution. We are going to finish up phase 1 in this post and will have a completed framework to begin our next phase in which we will build an AngularJS application.
Phase 1 – Start at the start (Continued)

Add the Web Development Tooling
When you start with an empty solution, you will find we need to configure some helpful tools to improve our Web development workflow. These tools are Node Package Manager (NPM), Bower, Gulp and IntelliSense for JavaScript.
The following material will need to be updated soon, as the cogs of Microsoft’s development team continue to turn. Expect the following steps to become much easier in an upcoming release. For now, these are the steps you need to follow to configure this tooling.
Setup Node Package manager
NPM is a package manager for JavaScript. It allows you to easily add functionality to your project that will be integral as we move forward. If you haven’t already installed node.js, you will need to do it by downloading node and installing it from their website, here. If Visual Studio was open when you installed node.js, you will need to restart Visual Studio.
Once Node is installed, we need to do to add the package.json file. To do this, press Ctrl+Shift+A in our Project Solution Explorer and add a “npm Configuration File” and ensure it is named package.json.
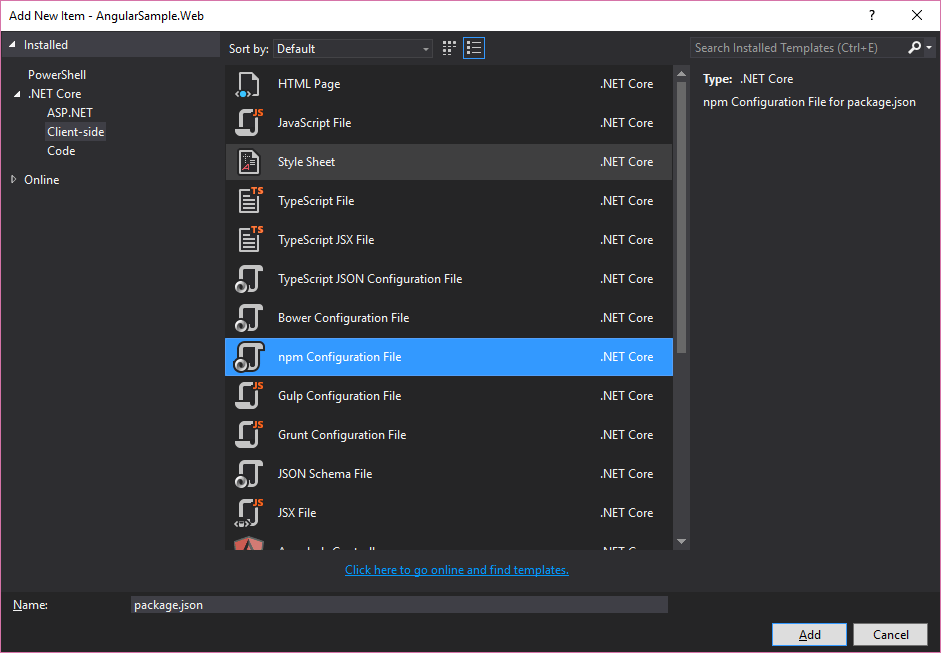
You can learn more about the package configuration file here. The primary area you should focus on for what we are doing will be the devDependencies section. We will use this section to add some additional tools later on in this series. For now, here is what our package.json file looks like:
{
  "version": "1.0.0",
  "name": "angular sample",
  "description": "A sample application created for the Sigao Studios Blog",
  "private": true,
  { "license": "MIT" },
  "devDependencies": {
  }
}
Setup Bower
We will use npm to install our testing frameworks and similar tools. For our JavaScript packages such as AngularJS, Bootstrap or Moment, we will use Bower. To setup Bower, we will use the package manager console to build a default Bower file.
- Click Tools -> Nuget Package Manager -> Package Manager Console
- Type
npm install -g bower- This command will install Bower globally.
- Restart Visual Studio.

- While we are waiting for Visual Studio to come back up, we can use Bower Init to initialize our Bower configuration. To do so, we will need to open a node.js command prompt (a shortcut was added when you installed node.js).
- You will need to change directories to the root of your AngularSample.Web project.
- Once you are in the root, type
bower init. - Provide the following responses when prompted
- Name: We used AngularSample.Web. This is the name of your application.
- Description: A description of your application.
- Main File: We used index.html.
- Keywords: A list of keywords that describe your solution
- Authors: Who wrote the application?
- License: The Default is MIT. We use that for our open source and demo code. Enter the license you adopt for your code.
- Homepage: We used the Sigao Studios page.
- Set currently installed components as dependencies: Y
- Add commonly ignored files to ignore list? Y
- Would you like to mark this package as private which prevents it from being accidentally published to the directory? Y
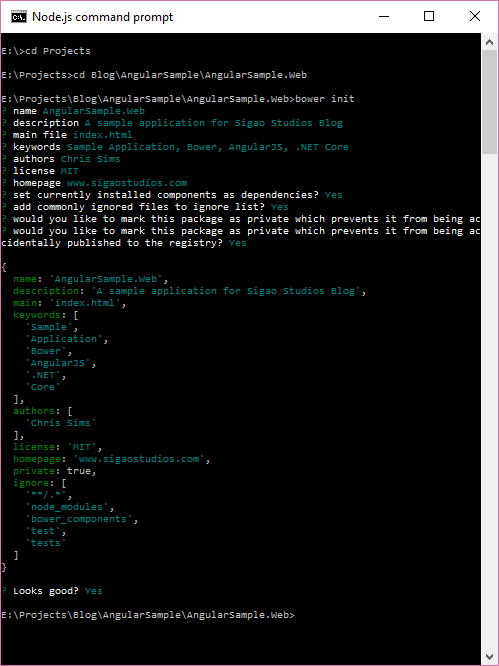
- Once you finish responding, the Bower tool will create a bower.json file and store it in the current directory. When you return to Visual Studio, you are now ready to begin using Bower.
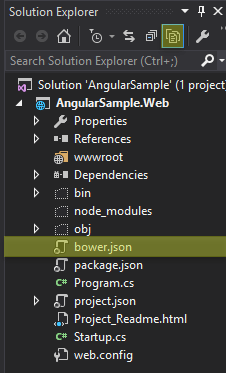
When you return to Visual Studio, you won’t see your bower.json file listed in the solution explorer. That’s because it is hidden by default. To show it, you will need to select the Show All Files option in the solution explorer toolbar.
Now, let’s add a .bowerrc file to let Bower know where to install our packages.
- Add a new file to our project called “.bowerrc”
- In order to have Bower install packages in the “wwwroot/lib” folder, add the following code:
{
  "directory": "wwwroot/lib"
}
Finally, here is the bower.json file we created.
{
  "name": "AngularSample.Web",
  "description": "A sample application for Sigao Studios Blog",
  "main": "index.html",
  "keywords": [
    "Sample",
    "Application",
    "Bower",
    "AngularJS",
    ".NET",
    "Core"
  ],
  "authors": [
    "Chris Sims"
  ],
  "license": "MIT",
  "homepage": "www.sigaostudios.com",
  "private": true,
  "ignore": [
    "**/.*",
    "node_modules",
    "bower_components",
    "test",
    "tests"
  ]
}
We will come back to this in a little bit and add several JavaScript libraries, but for now, let’s continue on to Gulp.
Setup Gulp
Gulp JavaScript task builder that is extremely helpful at processing your site content before serving. You can use it to compile SASS or LESS, minify your JavaScript and bundle your files together. You do this by creating a series of tasks that are defined by JavaScript. These tasks can be kicked off manually, or linked to events in Visual Studio such as “Pre-build”, “Post-build” or “Project Open.” To install Gulp, we will use npm and the package.json file.
Open your package.json file and the following dependencies to your devDependencies list.
{
  "version": "1.0.0",
  "name": "angular sample",
  "description": "A sample application created for the Sigao Studios Blog",
  "private": true,
  { "license": "MIT" },
  "devDependencies": {
    "gulp": "3.8.11",
    "gulp-concat": "2.5.2",
    "gulp-cssmin": "0.1.7",
    "gulp-uglify": "1.2.0",
    "gulp-less": "^3.1.0"
  }
}
Now that the framework is in place, we need to add a gulpfile.js to our project.
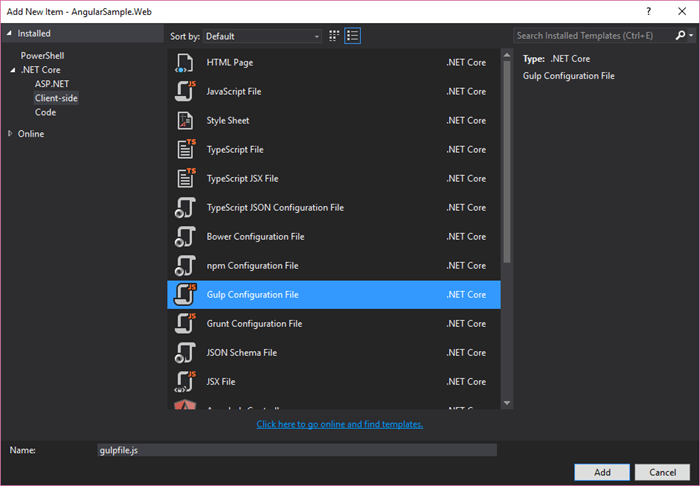
- Right click on the project in your Solution Explorer and click Add->New Item.
- Expand .NET Core and select Client-Side to view client side templates.
- Select the Gulp configuration file.
Your gulp file is pretty basic at the moment. It has no tasks and, for the moment, we will leave it that way. There is a lot to gulp, and we will explore that soon. For now, you can see a list of great gulp recipes here.
Setup IntelliSense
Now, one last thing before we get into some actual code. Let’s make sure we leverage the power of Visual Studio’s IntelliSense functionality for this project. In an empty project, the file necessary to make IntelliSense work is missing. We need to add it.
- Right click on the project in your Solution Explorer and click Add->New Item.
- This time, select the JavaScript file template.
- Name the file _references.js
Now, the last step in making IntelliSense work is to add the appropriate references to the references file. These reference directives tell IntelliSense where to look to get the information it needs to work. You specify a reference using the following syntax:
/// <reference path="wwwroot/lib/adal-angular/lib/adal.js" />
/// <reference path="wwwroot/lib/adal-angular/lib/adal-angular.js" />
/// <reference path="wwwroot/lib/angular/angular.js" />
You can automatically add these references using an autosync feature.
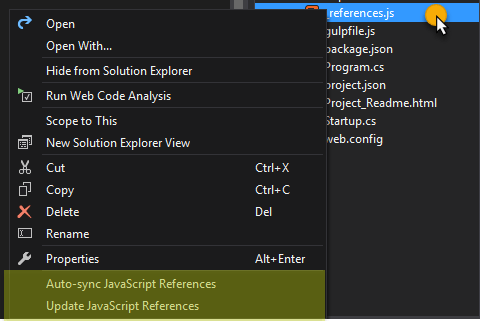
- Right click on the _references.js file in the solution explorer.
- Click Auto-sync javascript references.
- Right click on the _references.js file in the solution explorer.
- Click Update JavaScript references.
Now, our _references.js file looks like this:
/// <autosync enabled="true" />
/// <reference path="gulpfile.js" />
So, we have configured npm, Bower, Gulp and IntelliSense. Let’s get into some actual code.
Setting up .NET Core as a FileServer
When we finished our last post, we had a very basic ASP.NET Core solution that would serve up the simple text, “Hello World!” ASP.NET Core gives you a lot of flexibility to configure how your application handles requests. Let’s look at Startup.cs and see how we can leverage that flexibility.
Startup.cs
The startup.cs file is the entry point to the application. It allows you to configure request pipelines, setup services and much more. We won’t go into details here, for more information on startup.cs, check out the ASP.NET Core documentation here.
Our startup.cs file looks like this:
using System;
using System.Collections.Generic;
using System.Linq;
using System.Threading.Tasks;
using Microsoft.AspNetCore.Builder;
using Microsoft.AspNetCore.Hosting;
using Microsoft.AspNetCore.Http;
using Microsoft.Extensions.DependencyInjection;
using Microsoft.Extensions.Logging;

namespace AngularSample.Web
{
    public class Startup
    {
        // This method gets called by the runtime. Use this method to add services to the container.
        // For more information on how to configure your application, visit http://go.microsoft.com/fwlink/?LinkID=398940
        public void ConfigureServices(IServiceCollection services)
        {
        }

        // This method gets called by the runtime. Use this method to configure the HTTP request pipeline.
        public void Configure(IApplicationBuilder app, IHostingEnvironment env, ILoggerFactory loggerFactory)
        {
            loggerFactory.AddConsole();

            if (env.IsDevelopment())
            {
                app.UseDeveloperExceptionPage();
            }

            app.Run(async (context) =>
            {
                await context.Response.WriteAsync("Hello World!");
            });
        }
    }
}
I’ve highlighted the code that configures the application to respond with “Hello World!” We can add multiple service handlers, or roll our own, that instruct our application in how to handle requests. We will use the Static File Server functionality to host a very simple Web server for our demo application. To do that, we need do the following:
- Begin by removing lines 31-34 of startup.cs to stop it from responding with “Hello World!”
- Next, we must configure our Middleware to serve static files.
- Middleware are components that actually handle requests and responses. You can learn about Middleware here.
- Locate the Configure method in your startup.cs.
- Immediately after
loggerFactory.AddConsole();addapp.UseStaticFiles();to that method. - You should see a red squiggly line under the code you just added. You will need to add the package “
Microsoft.AspNetCore.StaticFiles“. To do so, hover over the line of code you just added, when you see a light bulb button popup underneath that, click it and then click “Add package Microsoft.AspNetCore.StaticFiles”

- Finally, let’s instruct our application to serve up “default files.” Default files are files with the name
Default.htm(l)orIndex.htm(l). If we don’t instruct our application to respond using Default Files, we will have to specify our file name in the request string (http://localhost:5000/index.htmlinstead ofhttp://localhost:5000/) - To do so, simply add app.UseDefaultFiles(); immediately before app.UseStaticFiles();
Our startup.cs file should now look like this:
using System;
using System.Collections.Generic;
using System.Linq;
using System.Threading.Tasks;
using Microsoft.AspNetCore.Builder;
using Microsoft.AspNetCore.Hosting;
using Microsoft.AspNetCore.Http;
using Microsoft.Extensions.DependencyInjection;
using Microsoft.Extensions.Logging;

namespace AngularSample.Web
{
    public class Startup
    {
        // This method gets called by the runtime. Use this method to add services to the container.
        // For more information on how to configure your application, visit http://go.microsoft.com/fwlink/?LinkID=398940
        public void ConfigureServices(IServiceCollection services)
        {
        }

        // This method gets called by the runtime. Use this method to configure the HTTP request pipeline.
        public void Configure(IApplicationBuilder app, IHostingEnvironment env, ILoggerFactory loggerFactory)
        {
            loggerFactory.AddConsole();

            app.UseDefaultFiles();
            app.UseStaticFiles();

            if (env.IsDevelopment())
            {
                app.UseDeveloperExceptionPage();
            }
        }
    }
}
If we run our app now, it will serve up any file located in the wwwroot directory of our application. I encourage you to review the ASP.NET Core documentation on serving static files to learn more. You can access that documentation here.
Now that we have our file server ready to go, let’s create a file to serve.
Use Bower to install the base packages
Before we go further, let’s add a few key JavaScript packages to our project. We will start with the following libraries:
- jQuery
- HTML5 Boilerplate
- Bootstrap
- Angular
To install these, we will use Bower.
- Open your Bower.json file (if you can’t see it, be sure to select the “show hidden files” option in your solution explorer).
- Add the following code just before the closing }
  ,
"dependencies": {
    "jquery": "2.2.3",
    "html5-boilerplate": "^5.3.0",
    "bootstrap": "3.3.6",
    "angular": "1.5.8"
}
Our bower.json file should now look like this:
{
  "name": "AngularSample.Web",
  "description": "A sample application for Sigao Studios Blog",
  "main": "index.html",
  "keywords": [
    "Sample",
    "Application",
    "Bower",
    "AngularJS",
    ".NET",
    "Core"
  ],
  "authors": [
    "Chris Sims"
  ],
  "license": "MIT",
  "homepage": "www.sigaostudios.com",
  "private": true,
  "ignore": [
    "**/.*",
    "node_modules",
    "bower_components",
    "test",
    "tests"
  ],
  "dependencies": {
    "jquery": "2.2.3",
    "html5-boilerplate": "^5.3.0",
    "bootstrap": "3.3.6",
    "angular": "1.5.8"
  }
}
When we save the bower.json file, Bower automatically begins loading the requested dependencies and storing them in the folder “wwwroot\lib.” Once that completes, our solution explorer should now look like this:

Create a base index.html
Finally, let’s create a simple index.html based on the HTML5 Boilerplate template in order to confirm that our solution is working.
- Create a new file in our project under the wwwroot directory by right clicking on the wwwroot directory in solution explorer, and clicking “Add -> Add new item”
- Select the HTML Page template and call the file “index.html”
- Use the following code for your index.html file
<!doctype html>
<html class="no-js" lang="">
<head>
    <meta charset="utf-8">
    <meta http-equiv="x-ua-compatible" content="ie=edge">
    <title>Sigao Studios - Angular Sample</title>

    <meta name="viewport" content="width=device-width, initial-scale=1">

    <link rel="stylesheet" href="lib/html5-boilerplate/dist/css/normalize.css" />
    <link rel="stylesheet" href="lib/html5-boilerplate/dist/css/main.css" />
    <link rel="stylesheet" href="lib/bootstrap/dist/css/bootstrap.css" />

    <script src="lib/html5-boilerplate/dist/js/vendor/modernizr-2.8.3.min.js"></script>
</head>
<body>
    <!--[if lt IE 8]>
        <p class="browserupgrade">You are using an <strong>outdated</strong> browser. Please <a href="http://browsehappy.com/">upgrade your browser</a> to improve your experience.</p>
    <![endif]-->
    <div class="container">
        <div class="page-header">
            <h1>Hello world!</h1>
        </div>
        <div class="well">
            <p>
                The true sign of intelligence is not knowledge but imagination. <b>-Albert Enstein</b>
            </p>
        </div>
    </div>


    <script src="lib/jquery/dist/jquery.js"></script>
    <script>window.jQuery || document.write('<script src="lib/jquery/dist/jquery.js"><\/script>')</script>
    <script src="lib/html5-boilerplate/dist/js/plugins.js"></script>
    <script src="lib/html5-boilerplate/dist/js/main.js"></script>
    <script src="lib/bootstrap/dist/js/bootstrap.js"></script>
    <script src="lib/angular/angular.js"></script>
    </body>
</html>
Once you save your index.html file, press F5 to start debug mode. When it runs, you should see the following:

Conclusion
We have now configured a full toolbox of modern tooling with which to build our Angular Sample application in ASP.NET Core. In the next phase, we will focus on AngularJS, and build an Angular application that follows the appropriate coding standards and best practices for Angular. From there, we will configure a WebAPI middle tier, and will then explore running those applications inside Docker containers. For now, play around with your app, explore adding other Bower packages, or read about Gulp. And if you have any questions, feel free to reach out to us using our contact page or comment on this post.